Pages

Tuesday, 5 January 2016

A new jersey top for the New Year!

I bought this John Kaldor fabric in the John Lewis sale recently but I've also seen it online elsewhere. It's a man made fibre, probably polyester, but it's a good weight and has a good amount of stretch. I think I paid £8 a metre and bought 2 metres. I hadn't decided which pattern I was going to use but I just liked the colours and design. That's enough of a reason for me to buy fabric!


You can see I'm wearing my Named Jamie jeans that I FINALLY got around to hemming the day before yesterday. Anyway, back to this top. I was browsing through my patterns and found this one, Simplicity 1463 that I made once before here. About time I made a second time, then! I always take a note of the alterations I make to a pattern and note the size(s) I cut out too so I can recreate/not make the same mistake twice!


This time I added another inch to the length so that's 3" I've added to this pattern. That seems about right as it's drafted for someone 5'6" tall and I'm 5'9". I also made the sleeves longer by cutting the length for the largest size. These tweaks have improved the wearability of this top and I'll keep them for a future version. I'm really happy with this top and I've already worn it once. It's sitting in the washing machine waiting to be washed, so that's a good sign!


I don't make New Year resolutions. Why make changes only at the start of the year when you can make them anytime? It's a good time for reflecting on the past year though, and what you'd like to do in the coming year. I have got a few vague things I want to work on with my sewing. I want to sew something in silk, improve my fitting generally and...I'm going to make a swimsuit in the near future. That'll be a challenge! My trusty Speedo is getting a bit baggy after a year's service so that's a sure sign the lycra has been eaten away by the chlorine and it's on borrowed time. I need a replacement but it takes me ages to find a new swimsuit. I try on about 25 before finding one that has the body length I need. So there's no choice, if it fits, I buy it.

I've already bought the (unfortunately boring black) fabric and powermesh (for the shelf bra) from Edinburgh Fabrics but I didn't buy enough elastic, or the correct width either so until I get back there, the project's on hold. If this swimsuit is wearable and I'm happy to be seen in public wearing it, I'm going to buy some lovely bright, patterned fabric so my instructor is dazzled by the pattern and can't see my swimming mistakes! *deluded*

Sunday, 3 January 2016

Coral and cobalt blue blouse


This is just soooo 2015, darling! A blast from the past...but good to give it the blog post it truly deserves! This is actually a blouse I sewed up quite a few weeks ago, maybe at the end of November, and I've washed and worn it quite a few times. The sign of a successful sew!

This pattern, McCalls 6436, is now officially my favourite shirt pattern because I love the two piece sleeve which means I don't have to sew any tedious cuff plackets. Win! I also like the fact it has separate button plackets you have to sew on. I also made this blouse once before and love that version too.


I bought the fabric from MisanTextiles (not to be confused by Misan Fabrics which is also on the same street) in Berwick Street in London when we went on a wee holiday in early November. It's a lovely weight of viscose and was a remnant or in their sale in their lovely basement which is chock full of bargains. Just have a rummage! There was about 1.8 metres or 2 metres, I can't remember. Enough to make me a shirt using this pattern so I nabbed the whole length for £10. Result!


The buttons were from my tartan stash tin and all other notions from my stash. I enjoy rummaging through my button tin to see if there are any buttons that'll be perfect fro whatever I'm working on at that time. It's surprising how often I find something though!

I cut this version shorter in the body as it's exceedingly long if you cut it straight from the pattern. Too long even on me! I think I shortened the body by 6cm but it's so long since I made it I can't remember.

Happy New Year to you all and keep watching. There will be more posts coming. Back to work on Tuesday but plenty more sewing to show you. Until then...


Saturday, 2 January 2016

Grey sort of stripey trousers


Well, I guess the title sort of says it all really! I've been spending some quality time with my sewing machine and overlocker recently and I'm loving it. Time to start blogging what I've made.


I bought the fabric for these trousers in the summer sale in John Lewis. It's a 100% wool and it lovely to work with, plus it was only £8 a metre (I bought 2 metres). I decided to add a half lining to make them less scratchy for all-day wearing. I found the 100% cupro lining somewhere in my stash. I've had to tidy up my sewing space (the dining table in the living room) as...well...we needed the dining table!


I sewed up as much as I could using the overlocker. Otherwise I used the sewing machine and then the overlocker to finish the seam edges. I made the inner yoke from the lining fabric to avoid scratchiness. I don't think I've used a heavy enough interfacing though, it doesn't look or feel sturdy enough but I'm fine with that. I added 1" in height to the rise but I think I could have got away without this change. I added 3" to the leg length and ended up cutting off 1" when hemming but that's the way I like to work. I'd rather add too much that later need to cut off. I hate trousers that are too short, even by a tiny amount!


The pattern is New Look 6035 that I got free with Sew magazine earlier this year. The line drawings are good and it looks like there are some really good basics to be made from it. This was the first time using this pattern and I just wanted to see how it would sew up. I like it and will be using it again!


It looks a simple trouser pattern but the devil's in the fitting. There's a side zip and a yoke. The zip is inserted up through this yoke. The seams of the yoke need to match too. A bit of a brain teaser to get the fit and all the seams matching but it's worked out fine.I finished the hems with black satin bias binding from my stash and hand stitched them.

I'm learning that the more time spent measuring the pattern pieces and adjusting before cutting out, and trying on to adjust the fit before final seam-sewing, are steps to take your time over. Time spent doing these steps really pays off. I'm getting better at slowing down!

Wednesday, 30 December 2015

Another floral TNT


Yes, it's another floral fabric version of my all time favourite Tried and Tested pattern, Simplicity1364 Cant tell you how much I love this pattern but you're probably getting a good idea! I bought this fabric from John Lewis in Oxford Street when we went to London for a short break in mid-November. It's quite unusual for me to choose such a bland background colour but the flowers are suitably in your face for me to feel comfortable with it!


Here's a close-up of the fabric just ink car you didn't see it properly in the first photo. The fabric is probably a polyester and definitely 100% man made fibre, whatever it is. 


There are some details in this pattern that I love. One of them is the dart at each elbow, something you might be able to see in the photo above. It's the blouse equivalent of a tailored jacket's two piece sleeve, the top sleeve just hangs beautifully and bends well at the elbow. Just a small detail but lovely. 


This was a top I sewed up quite quickly. I thought I'd caught up with my blogging but there are a couple of other things I need to blog about, so I'll do those in the next few days. I'm currently on holiday so there's a lot of sewing being done!  

Wednesday, 23 December 2015

#sewingtop5 The hits and misses of 2015


Well folks, this'll be interesting! 2015 saw my first full year of sewing blogging so let's see what we have for 5 of the best...and 5 of the worst!

My number 1 favourite, favourite of all time would be this floral top which honestly gets washed and worn as soon as it's dry. Sometimes it was even ironed before wearing but not always...


Number 2 would have to be a Vintage pattern Pledge top using a pattern I'd used before in the 1980's. And I made a matching snood! Now that's what I call fun times, people.


Number 3...has to be my favourite going-out top. It's a simple two piece pattern but I took HOURS deciding on just the right pattern placement. It was a remnant I bought for about £4 so the challenge was really on to make something great with it!


Love Number 4! It may be 100% polyester, but this shirt is such a loud and very 'Me' print that I can forgive it. It's a definite hit. And I surprised myself by liking this new pattern.


Hit number 5 is this lovely floral shirt using another new pattern which has now become my go-to shirt pattern. The pattern has a two piece sleeve and this eliminates the need for fiddly placket sewing. Hurray! I love the fabric too with its hits of electric blue and acid green. 


And now, onto the Top 5 fails...the section of shame! Here we go, and in no particular order. Thankfully not too much stuff in this section but still...here's the first one. This was a green top I made using viscose jersey before I learnt (the hard way) that it's essential to pre-wash fabrics. It shrunk a bit bit and became too short for my liking. It was sent to a charity shop. It was also the first jersey fabric I'd sewn so there's always a learning curve.


Number 2 has to be this striped jersey top. Well, it was at the start of my jersey sewing career and the fabric itself was a thicker cotton with lycra. But it was just too thick and then I had second thoughts about the red and black stripes...Dennis the Menace anyone? I didn't even finish sewing it. It had to go. In the bin. And I didn't even blog about it. So here's its debut...and swansong!


And on to Horror Number 3. I think I have worn this Paisley blouse once underneath a cardigan and scarf. Since then it's been hanging in my wardrobe and will be butchered sometime in the future as the fabric is a lovely fine cotton. And I LOVE Paisley pattern.


Onto Number 4 in the Walk of Shame. This is the first cream top* I made and the fabric choice wasn't good. The sleeves were also too tight around the forearms and it was too tight across the back. If there had been any stretch in the fabric I might have got away with it but it just wasn't comfortable to wear all day at work. I think it went in the bin. *Not to be confused with my second cream top which is a success.


And last but not least in the galaxy of infamy, a pair of denim-look Ultimate trousers. I just don't like the fabric. It just doesn't have any sympathetic stretch, any stretch it does have is in the wrong places. What more can I say! They've been put away with the rest of the summer clothes but I don't know how long they'll survive come spring-time! 


So, that was the year that was. I have made a lot of tops! But I'm a separates person and don't really go in for dresses. There are also lots of other things I've made that I love wearing - all those pyjamas, jackets, yet more tops for instance - that haven't made it onto the hit list of favourites that could have gone on to the hits. And there are a few other things that could be added to the misses too but that's the way of life, isn't it?


Tuesday, 22 December 2015

Pyjamas pyjamas

Well the big day is getting ever closer and I think I'm sorted for Christmas and the holiday season. Even more so now I've made *drum roll* new pyjamas! Well, two pairs of them although they were made weeks apart. They were both made using Kwik Sew 2811 which has become my go-to-pattern for PJs. The first pair I made in October and I'm only just getting round to blogging them now. I have worn and washed them though. I bought the fabric, 100% brushed cotton, from John Lewis but can't remember how much it was a metre. Confession time. I just cut the pattern and literally threw these pyjamas through the sewing machine and overlocker. Apart from the fronts, absolutely no time was wasted agonising over pattern matching. And I didn't do any piping which saved a lot of time too.


I didn't bother with the sleeve cuffs and just added extra length at the cutting stage. I had 4 suitable buttons in my tartan button box, so that's what I used. Admittedly, it could probably do with 5 buttons but these 4 will do. The major thing I did wrong was sew the buttonholes on the wrong side! Ah well! As I said, it took me a surprisingly short amount of time to make these...


For all their flaws, I really like these. It was also a lesson in how much more time it takes to add the extra bits to PJs and I really did need this pair to be sewn up ASAP. So that's what I got!

The next pair also happened quite quickly too. Same pattern but I bought the 100% brushed cotton fabric in  the summer form Minerva fabrics. I cut them out on a Friday evening after work and sewed the major part of them up over the weekend. I took more care over these because I didn't need them in such a hurry. I added sleeve cuffs, flat piping and pattern matching. It was the first time I've tried flat piping and I think I've made it a bit wide. Anyway, have a look and see what you think.


Again, I found five (!) suitable buttons from the tartan button tin so used them. I even managed to sew the buttonholes on the correct side. I didn't add leg cuffs just because I couldn't be bothered. Construction-wise I overlocked as much as I could, using the sewing machine for more accurate sewing of the collar, pocket and anything with the flat piping.


So, that's my PJ wardrobe replenished for winter but you'll be seeing more versions in springtime. I love this pattern! I have altered the collar though. The pattern has a grown-on facing on the front pattern pieces but I cut this off along the fold line and added seam allowances. By doing this I can add piping all around the collar and down the seam where the facing joins the front piece. I've also rounded the facing edge to make piping easier. The blue/black checked pyjamas above are true to the original pattern. 

Monday, 14 December 2015

I made jeans!


Yes folks, this is why there's been so much 'radio-silence' on the blog. I've been busy and taking my time with these jeans and they've turned out lovely. I'm very pleased with them, can you tell?

The pattern
As a taller than average person, I decided to used Named Jamie jeans pattern and bought the PDF a while ago. After a wee while spent cutting and taping the pieces together the pattern was ready for any alternations I'd need to make. So I then spent ages measuring myself and also a pair of RTW jeans that were ok but had fit issues (the rise was too short). I altered the paper pattern by adding 1" to the rise and 2" to the leg length. At 5'9" I'm only 1" taller than the woman Named patterns designs for, but hey ho, we're all different and that's why we measure twice, cut once!


I also added 2" in width from the knee to the hem of the back leg pattern piece as I didn't want skinny lower legs. I also added 1" in width from the knee to the hems of the front leg pattern pieces. Ultimately it was a guessing game where to add the extra width but it's worked out very well.

The fabric and notions
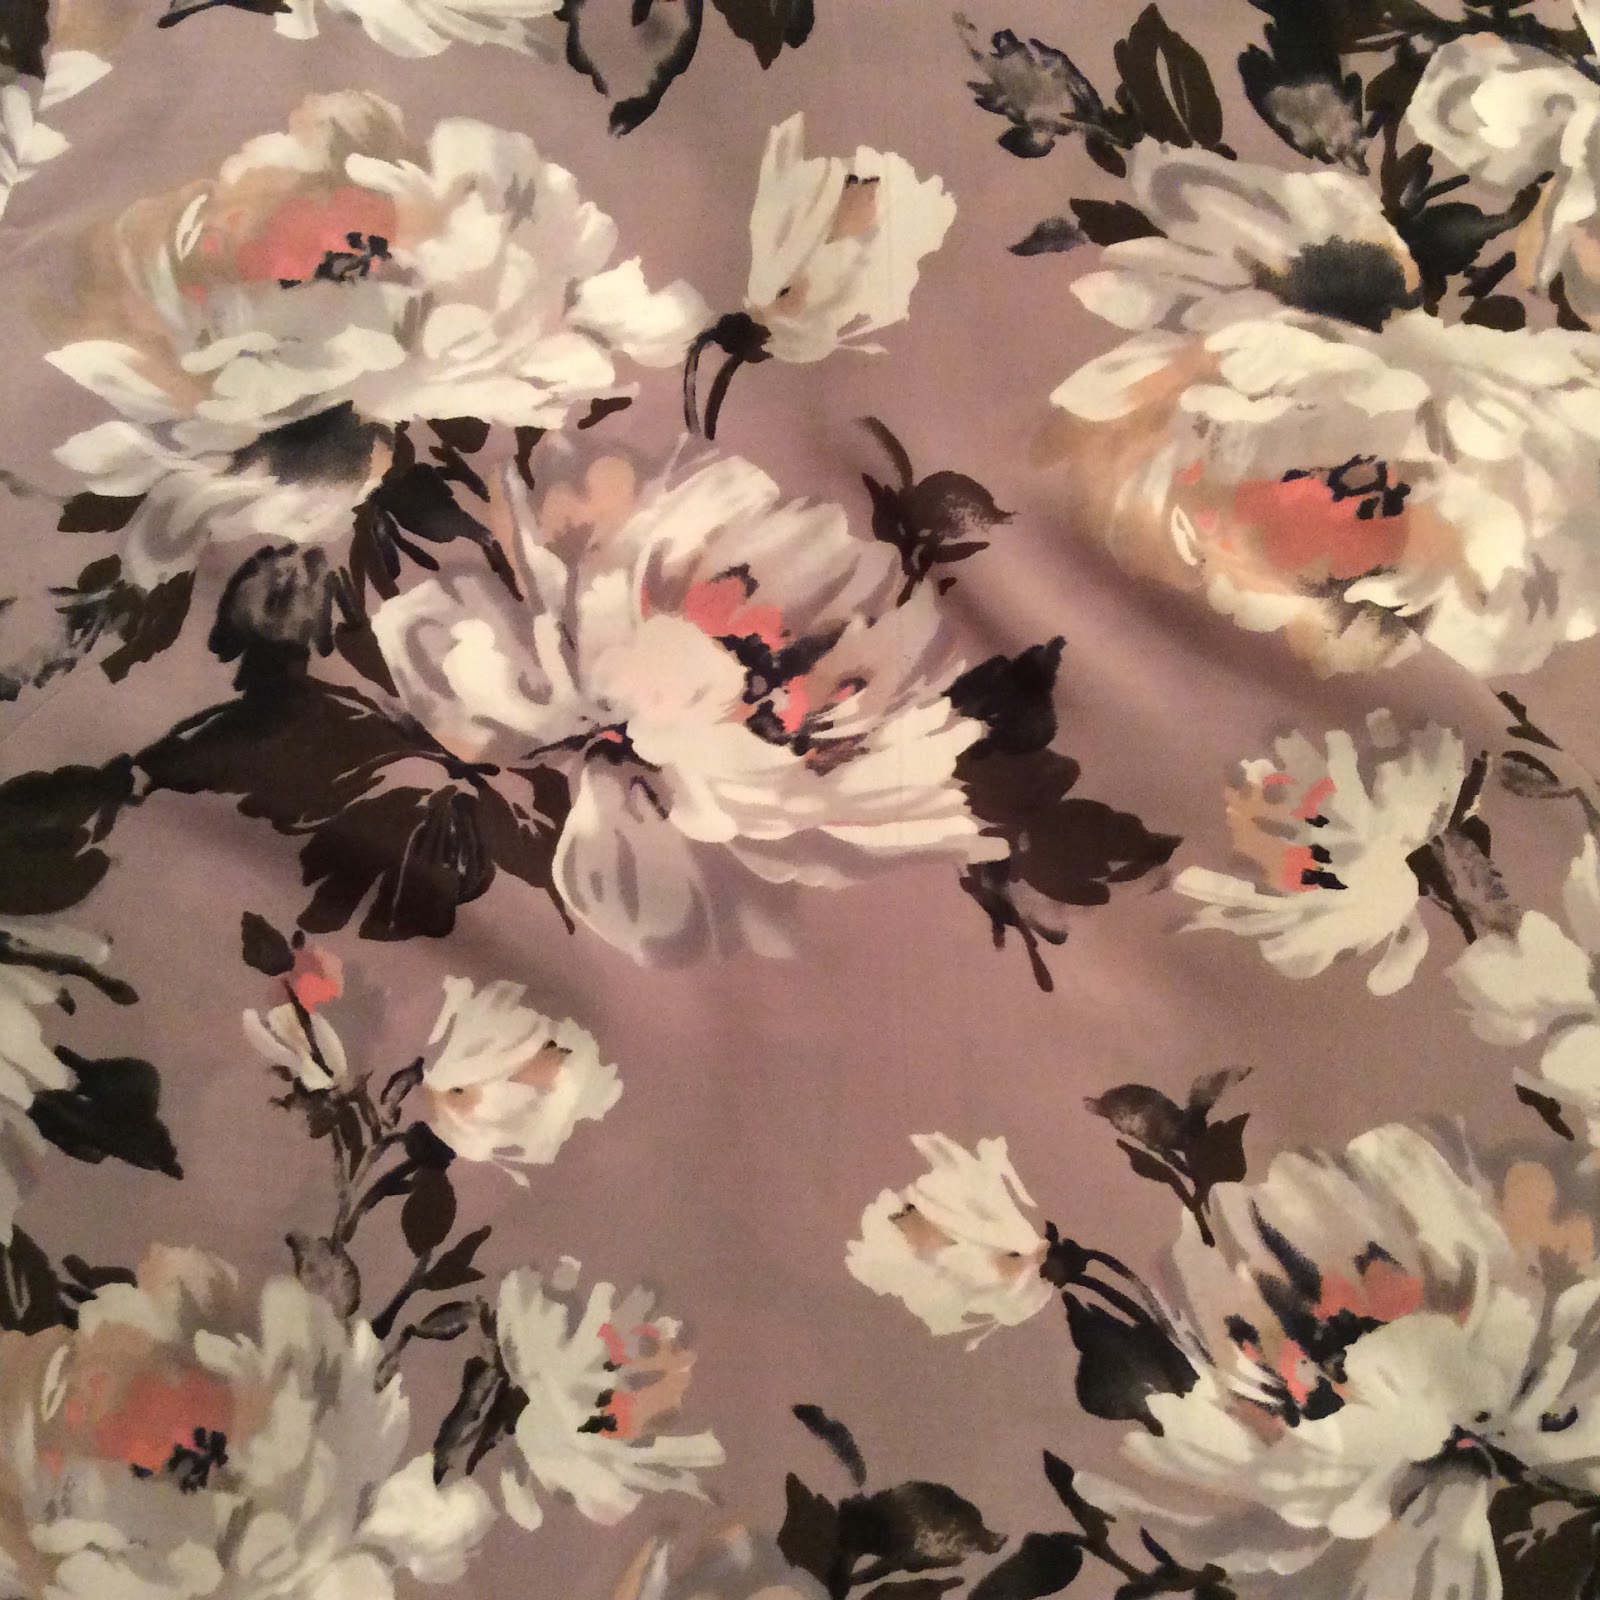
This was a stretch denim from Edinburgh Fabrics and seems to be a new bolt of it as they were sold out for a while. I don't remember how much lycra it has in it, it's so long since I bought it. I did pre-wash the length of denim before cutting out. I also bought the rivets there and the metal jeans zip as they sell YKK zips which are the best zips, in my opinion. The pattern says buy a 4" zip but I suspected I'd have to add height to the rise so I bought a 6" zip and that was perfect. The jeans button I bought from John Lewis but they didn't have the copper coloured rivets to go with it. It has taken a long time to collect all the stuff!


Sewing
My sewing machine seriously doesn't like topstitching thread. At all. No matter what you do with the tension etc. I read on another blog that if you run two spools of normal polyester thread through the needle and run one thread through the bobbin, the effect is just like using topstitching thread. And it works! You have to do a bit experimenting with tension on a scrap of denim and a top tip from me, take hold of the two needle thread ends and pull them tight just after you lower the presser foots and then start sewing. That will help stop a small loop forming on one of the topstiched threads. It was fairly straightforward sewing the front and back pockets, the back yoke and then topstitching as needed, it was on to assembling everything and fitting.


Fitting
Ah, the most time consuming bit of the whole project! And definitely the bit to take your time over and to get it right. I sewed the crotch seam and tried them on. As they were good enough, I sewed the zip and fly, which went in easily enough. I think the fly topstitching was ripped out once though!


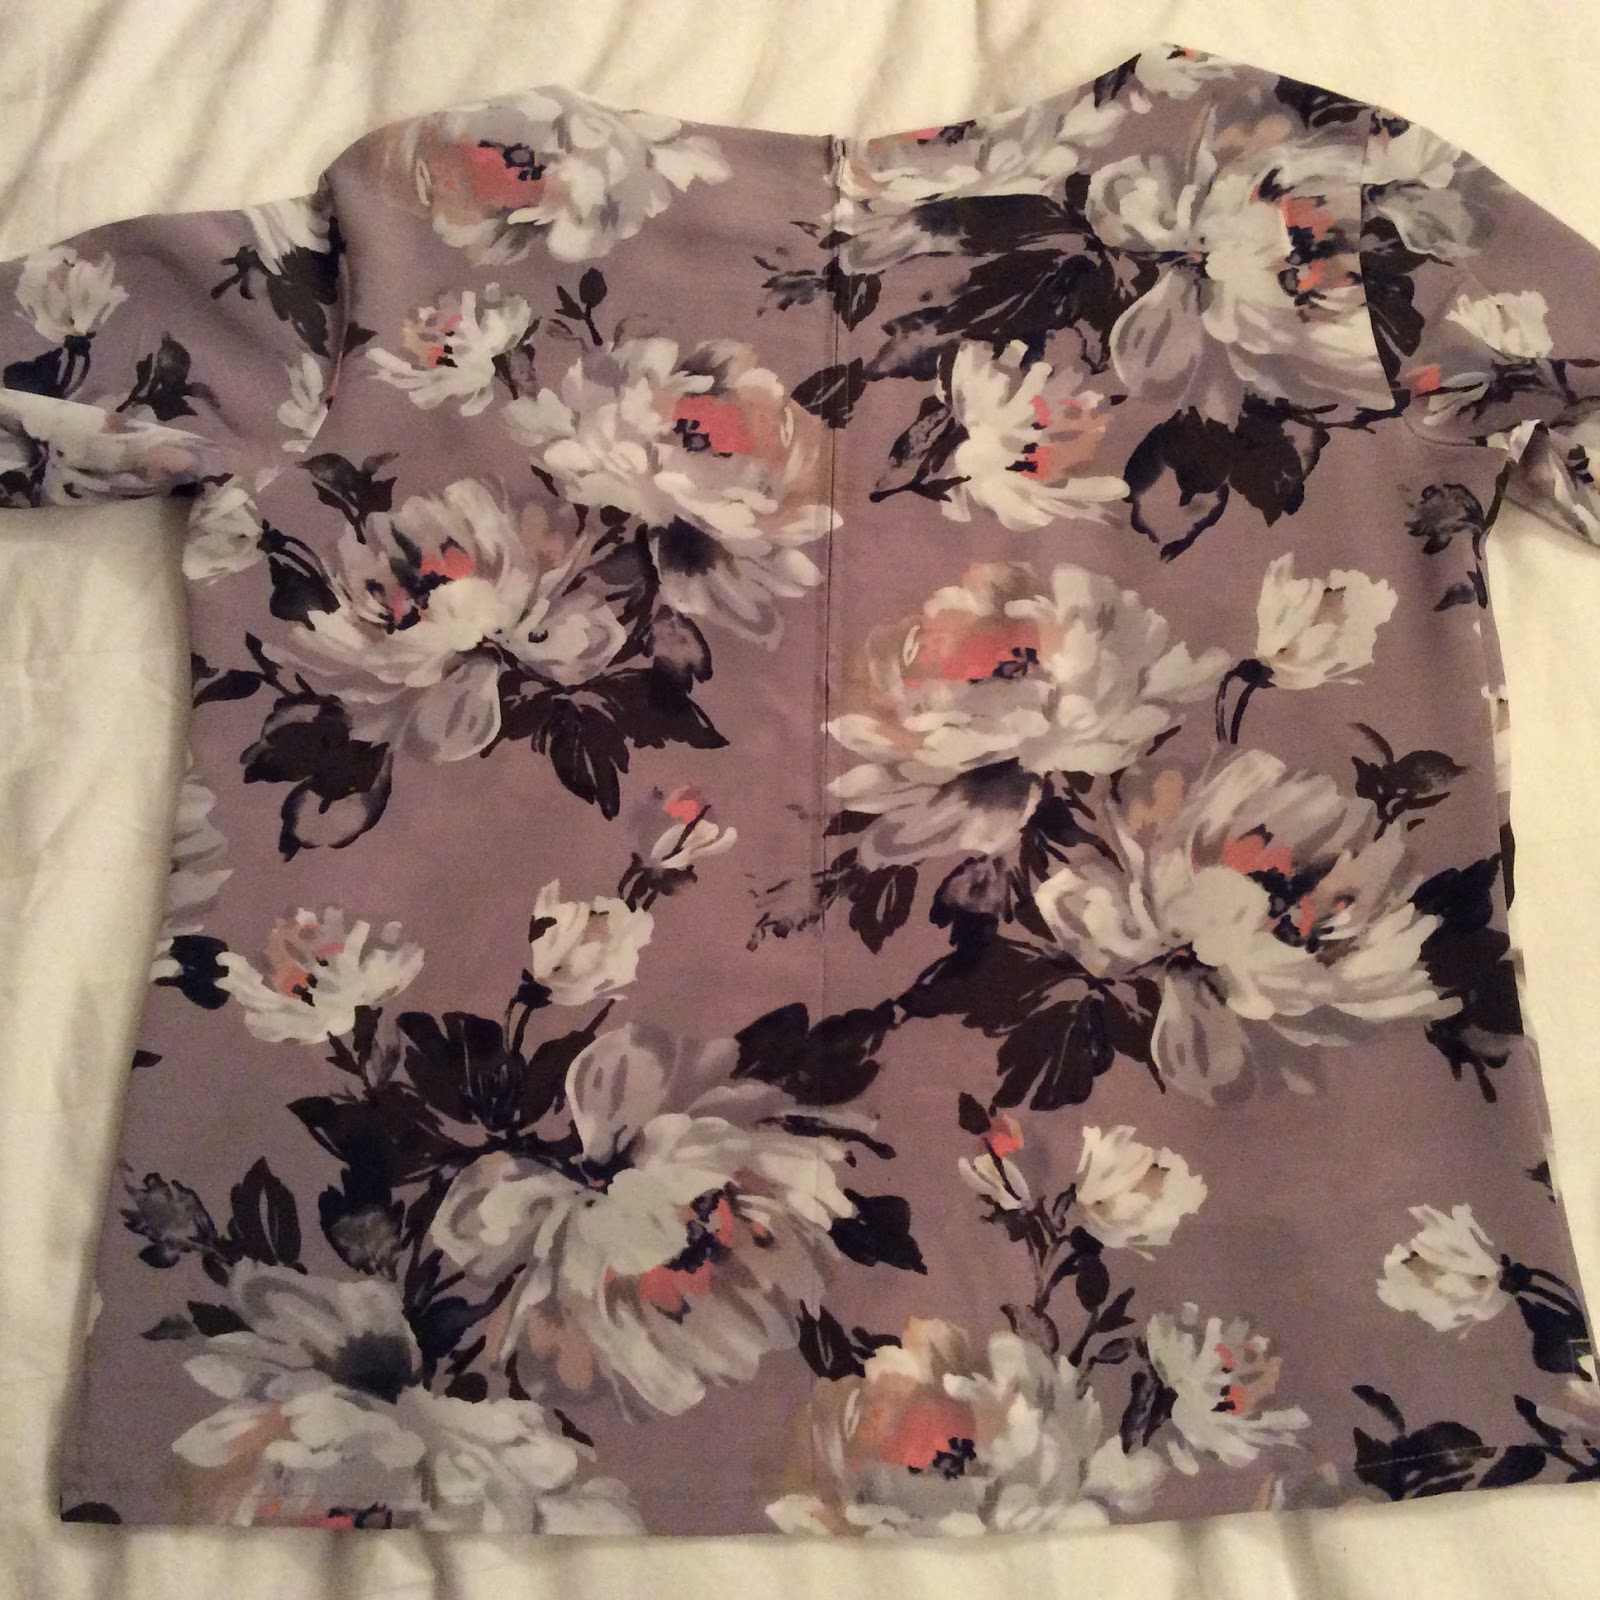
I pinned and machine basted the inner and outer leg seams and the crotch seam together using the longest stitch on my machine. Then tried them on. And repeated the process until happy! Then overlocked all these seams. I took 11cm in at the back waist and 4cm from each waist side seam, tapering to nothing at the hips. The inner and outer legs I sewed with a 5/8" seam allowance. I have jeans that don't gape at the centre back. Hurray! I think this is due to the curved waistband too, which I reduced by 1" at the centre back.


I didn't add belt loops as I only wear a belt if the waist is too big. And it shouldn't be on these custom made jeans, should it? Ha ha!


Finishing
Get the hammer out! I interfaced each end of the waistband using a medim weight cotton fusible interfacing, not the whole length of the waistband. Only time will tell if this was a good decision or not!The jeans button went in well and I eyeballed the centre of the waistband. The buttonhole was done after some trial and error using a scrap of denim and varying the stitch length.


The rivets could be a bit tricky if you aren't brave! I used the spike on my seam ripper to put a hole through the edge of my pockets but the rivet back still wouldn't poke though. So I used the seam ripper to 'encourage' a small hole that the rivet back went through. Put the top on, hammer it in and both rivets have one wash already.

I haven't tackled the hems yet so technically these jeans aren't finished yet. I've washed them just in case there's any shrinkage and I'll use my double topstitching to sew the hem.

Now onto an easier job, checked/tartan brushed cotton pyjamas with flat piping...I'll be back!